HowToAcceptSelfSignedCertsForHttps
Parent: UserExperience
A number of sites including Soylentnews, in places, use self signed certs for https encryption.
The first time you go to such a site, you will see some sort of warning from your browser. The exact nature of that warning varies, each browser handles it a little differently. What is important is that you need to use whatever facility is provided to tell your browser that it is ok to continue on connecting, and, unless you want to deal with that message every time you visit the site, you need to tell it to remember your choice.
Some examples of typical browser warnings
Below, I have loosely recorded the steps I had to take with some of the browsers I have available here and some other instructions from various places. If you are having trouble, reading through these - even if your exact browser is not here - may help a bit. You can at least get a rough ideas of what is required.
Internet Explorer
Ignore the warning message and proceed to the website. A certificate error is displayed in the address bar.
Click Certificate error in the address bar.
Click View certificates.
Click the Certification Path tab
Select the root certificate and click View Certificate.
Click Install Certificate to start another Certificate Import wizard.
Note: If the Install Certificate button remains disabled, you must click Tools > Internet options > Content > Certificates > Trusted Root Certificate Authorities and import the root certificate manually.
Click Next.
Select Place all certificates in the following store, click Browse, select Trusted Root Certificate Authorities, click OK and click Next.
Click Finish.
Click Yes to import the root signer certificate into Internet Explorer’s certificate trust store
Click OK to close the Certificate Import wizard.
Click OK twice to close the Certificate window.
Close all instances of Internet Explorer.
Repeat step 1. Internet Explorer does not warn you about the untrusted certificate. If the browser warns you about mismatched certificate address, click Tools > Internet Options > Advanced. Scroll down and clear the Warn about certificate address mismatch check box. Click OK. Close Internet Explorer and repeat step 1.
Firefox
(Is probably similar to other browsers using the Firefox engine)
- Select 'I Understand the Risks'
- Select 'Add Exception'
- Make sure 'Permanently store this exception' is checked
- Select 'Confirm Security Exception'
-
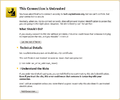
Connection untrusted screen in Firefox
-
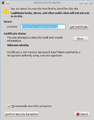
Add security exception screen in Firefox


Opera
(Note the very newest versions of Opera are using a diffderent engine)
-- Mac Version 10.10.0
'Warning this page may not be secure'
'You need to approve or reject the loading of this page' /Help/ /Reject/ /Approve/
-select security tab, see:
The certificate for "www.xxxxx.org" is signed by the unknown Certificate Authority "www.xxxxx.org". It is not possible to verify that this is a valid certificate.
/X/ Remember my choice for this certificate
Then select the main /Approve/ button.
Safari
(Is probably similar to other browsers using the 'Webkit' engine)
-- Mac Version 4.1.3
'Safari can't verify the identity of the website www.xxxxx.org'
/Show Certificate/ /Cancel/ /Continue/
- select show certificate
- select Trust Setting
- select When using this certificate, /Always Trust/
- select /Continue/
Google Chrome
Using Chrome, hit a page on your server via HTTPS and continue past the red warning page (assuming you haven't done this already).
Open up Chrome Settings > Show advanced settings > HTTPS/SSL > Manage Certificates.
Click the Authorities tab and scroll down to find your certificate under the Organization Name that you gave to the certificate.
Select it, click Edit, check all the boxes and click OK. You may have to restart Chrome.
You should get the nice green lock on your pages now.
EDIT: I tried this again on a new machine and the certificate did not appear on the Manage Certificates window just by continuing from the red untrusted certificate page. I had to do the following:
On the page with the untrusted certificate (https:// is crossed out in red), click the lock > Certificate Information.
Click the Details tab > Export. Choose PKCS #7, single certificate as the file format.
Then follow my original instructions to get to the Manage Certificates page. Click the Authorities tab >
Import and choose the file to which you exported the certificate, and make sure to choose PKCS #7, single certificate as the file type.
If prompted certification store, choose Trusted Root Certificate Authorities
Check all boxes and click OK. Restart Chrome.
Google Chrome, Mac OS X and Self-Signed SSL Certificates
(Another approach, from http://www.robpeck.com/2010/10/google-chrome-mac-os-x-and-self-signed-ssl-certificates/ )
By Rob Peck · Published 6 October 2010 · apache, apple, linux, networking, security, mac, osx
I've been using Google Chrome as my primary browser for the last few months. Sorry, Firefox, but with all the stuff I need to work installed, you're so slow as to be unusable. Up to and including having to force-quit at the end of the day. Chrome starts and stops quickly But that's not the purpose of this entry. The purpose is how to live with self-signed SSL certificates and Google Chrome.
Let's say you have a server with a self-signed HTTP SSL certificate. Every time you hit a page, you get a nasty error message. You ignore it once and it's fine for that browsing session. But when you restart, it's back. Unlike Firefox, there's no easy way to say "yes, I know what I'm doing, ignore this." This is an oversight I wish Chromium would correct, but until they do, we have to hack our way around it.
Caveat: these instructions are written for Mac OS X. PC instructions will be slightly different at PCs don't have a keychain, and Google Chrome (unlike Firefox) uses the system keychain.
So here's how to get Google Chrome to play nicely with your self-signed SSL certificate:
On your web server, copy the crt file (in my case, server.crt) over to your Macintosh. I scp'd it to my Desktop for ease of work.
- These directions has been updated. Thanks to Josh below for pointing out a slightly easier way.**
In the address bar, click the little lock with the X. This will bring up a small information screen. Click the button that says "Certificate Information."
Click and drag the image to your desktop. It looks like a little certificate.
Double-click it. This will bring up the Keychain Access utility. Enter your password to unlock it.
Be sure you add the certificate to the System keychain, not the login keychain. Click "Always Trust," even though this doesn't seem to do anything.
After it has been added, double-click it. You may have to authenticate again.
Expand the "Trust" section.
"When using this certificate," set to "Always Trust"
That's it! Close Keychain Access and restart Chrome, and your self-signed certificate should be recognized now by the browser.
This is one thing I hope Google/Chromium fixes soon as it should not be this difficult. Self-signed SSL certificates are used *a lot *in the business world, and there should be an easier way for someone who knows what they are doing to be able to ignore this error than copying certificates around and manually adding them to the system keychain.
Apparently Chrome has changed how it handles self signed certs a few times
Have a look here: http://stackoverflow.com/questions/7580508/getting-chrome-to-accept-self-signed-localhost-certificate
for some more approaches if the above does not work for you.
Five Tips for Using Self Signed SSL Certificates with iOS
(from http://blog.httpwatch.com/2013/12/12/five-tips-for-using-self-signed-ssl-certificates-with-ios/ )
(Easier to read if you go to above link, also, has pics :-) )
December 12, 2013
SSL certificates are relatively cheap to purchase, but sometimes it would be easier if you could create your own. You might need to setup SSL on development and test servers that have different host names or on systems that will only ever be accessed on your local network.
Self-signed SSL certificates allow you to quickly create certificates for free, without having to pay a Certificate Authority (CA) or comply with any auditing requirements.
The downside of using self-signed certificates is that browsers will not automatically trust sites that use them. In Mobile Safari you would see an error like this:
The HttpWatch iOS app provides some more detail:
The rest of this post provides tips on how to setup iOS to avoid these errors and how to simplify the creation and management of self signed certificates.
Tip #1 – Don’t Accept your Self-Signed Certificate in Mobile Safari
It’s tempting to just select Continue or Details->Accept when you first try using your self-signed certificate in Safari:
This would allow you to open the site in Safari, but there are two significant downsides: Accepting the certificate in Safari just adds an SSL exception that prevents Safari warning you about the site. It doesn’t install the certificate as a trusted certificate on iOS. Any other apps (e.g. Chrome, HttpWatch, etc…) on the device will still fail to connect to the site. Once the SSL exception is added there doesn’t seem to be a way to remove it in iOS 7. In previous versions going to Settings->Safari and selecting ‘Clear Cookies and Data’ would delete it. This no longer seems to work in iOS 7 (please leave a comment if you know how to do this).
Tip #2 – Install Self-Signed Certificates as an iOS Configuration Profile
You can add an SSL certificate to the trusted list in iOS by simply emailing the file to yourself as an attachment:
Then select Install to add the certificate. Once you’ve done this you use the certificate without warnings in Safari or other iOS apps that use the device’s keychain..
Also unlike Safari SSL exceptions, you can access the certificate at any time in Settings->General->Profiles and remove it if required:
Apple provides an iPhone configuration utility for Mac and PC that can also install certificates. This would be a better option where email is not available or you have a larger number of iOS devices to manage.
Tip #3 – Don’t create Self-Signed Certificates within IIS
Creating self-signed certificates in IIS appears to be easy. You just select the ‘Create Self-Signed Certificate’ menu item:
Unfortunately, IIS uses the computer name as the host name in the certificate:
It most cases the computer name will not match the intended host name and you end up with a self-signed certificate that is never trusted – even when it is added to iOS:
It’s possible to fix this problem by installing and running the SelfSSL tool from the IIS 6 Toolkit. However, it’s probably easier just to use OpenSSL as described in the next tip.
Tip #4 – Creating Self-Signed Certificates with OpenSSL is Easy
One of the easiest ways of creating a self-signed certificate is to use the OpenSSL command line tool that is available on most platforms and installed by default on Mac OSX.
First create a private key file:
openssl genrsa -out myselfsigned.key 2048
Then create the self signed certificate:
openssl req -new -x509 -key myselfsigned.key -out myselfsigned.cer -days 365 -subj /CN=www.mysite.com
You can use any filenames you like for the key and certificate (.cer) files. The /CN parameter needs to be set to the required hostname (e.g. for https://www.mysite.com in the example above). The days parameter specifies the expiration date as days from today’s date.
There’s even a site to do this if you don’t feel like downloading OpenSSL, but of course it’s more secure to do it yourself.
On Apache servers the key and certificate file can be used directly in your SSL configuration. With IIS you need a PFX file so that you can import the certificate into the Server Certificates section of IIS. OpenSSL can create the PFX file for you as well: openssl pkcs12 -export -out myselfsigned.pfx -inkey myselfsigned.key -in myselfsigned.cer
Tip # 5: Consider Creating Your Own Certificate Authority (CA)
One problem with self-signed certificates is that you’ll need to set up trust relationships for each certificate on each device. An alternative is to create your own Certificate Authority (CA) root certificate and then create certificates based on it.
Instead of paying a commercial CA to create SSL certificates on your behalf, you are acting as your own CA. The advantage is that your custom CA certificate only has to be installed once on each device. The devices will then automatically trust any certificates you issue based on your root CA certificate.
Creating the CA certificate is a simple two step process. First create a private key file as before:
openssl genrsa -out myCA.key 2048
Then create the certificate:
openssl req -x509 -new -key myCA.key -out myCA.cer -days 730 -subj /CN="My Custom CA"
The certificate file (myCA.cer) created above can be publicly shared and installed on iOS or other OS’s to act like a built in trusted root CA. Custom CA certificates on iOS are also stored in General->Settings->Profile:
The private key file (myCA.key) is only used when creating new SSL certificates.
You can create as many certificates as you like based on this CA certificate. There’s an extra step involved because you have to create a CSR (Client Signing Request) as if you were purchasing a commercial SSL certificate.
First you would create a private key:
openssl genrsa -out mycert1.key 2048
and then create the CSR:
openssl req -new -out mycert1.req -key mycert1.key -subj /CN=www2.mysite.com
Then use the CSR to create the certificate:
openssl x509 -req -in mycert1.req -out mycert1.cer -CAkey myCA.key -CA myCA.cer -days 365 -CAcreateserial -CAserial serial
The certificate created (mycert.cer) can be installed on a web server and accessed from any iOS device that already has the CA certificate installed.
Posted on December 12, 2013 in HttpWatch,iOS,SSL Tags: IIS,iOS,OpenSSL,SSL (4) Comments |Post a Comment RSS for this post |Trackback URL 4 Comments
Pingback: Create Your Own Trusted SSL Certificates for Development | Andy Drizen
Sam January 7, 2014 at 6:27 pm
To remove the SSL exception on Safari on iOS 7.0.4 you can reset all settings (General > Reset > Reset Settings). Unfortunately it deletes all your settings (go figure); but its one huge step better then a full restore and you lose your text messages.